Code Components for Canvas Apps
Code components for canvas apps implementation, security, and configuration
MCP get_skill({ skillId: "code-components-for-canvas-apps-1888244e" })Use this skill with your agent
Create a free account and connect via MCP
# Code Components for Canvas Apps Professional developers can use Power Apps component framework to create code components that can be used in their canvas apps. App makers can use Power Apps component framework to create, import, and add code components to canvas apps using [Microsoft Power Platform CLI](https://learn.microsoft.com/en-us/power-apps/developer/component-framework/get-powerapps-cli). > **Note**: Certain APIs might not be available in canvas apps. We recommend that you check each API to determine where it's available. ## Security Considerations > **Warning**: Code components contain code that may not be generated by Microsoft and can potentially access security tokens and data when rendered in Power Apps Studio. When adding code components to a canvas app, make sure that the code component solutions are from a trusted source. This vulnerability does not exist when playing the canvas app. ### Security Warning in Power Apps Studio When you open a canvas app that contains code components in Power Apps Studio, a warning message about potentially unsafe code appears. Code components in the Power Apps Studio environment have access to security tokens; hence only components from trusted sources should be opened. **Best Practices:** - Administrators and system customizers should review and validate all code components before importing them into an environment - Make components available to makers only after validation - The `Default` publisher is shown when you import code components by using an unmanaged solution or when you have used `pac pcf push` to install your code component 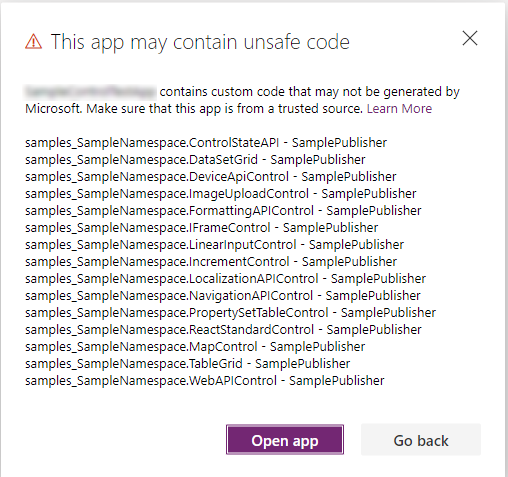 ## Prerequisites - A Power Apps license is required. More information: [Power Apps component framework licensing](https://learn.microsoft.com/en-us/power-apps/developer/component-framework/overview#licensing) - System administrator privileges are required to enable the Power Apps component framework feature in the environment ## Enable the Power Apps Component Framework Feature To add code components to an app, you need to enable the Power Apps component framework feature in each environment where you want to use them. By default, the Power Apps component feature is enabled for model-driven apps. ### Steps to Enable for Canvas Apps: 1. Sign in to [Power Apps](https://powerapps.microsoft.com/) 2. Select **Settings** , and then select **Admin Center** 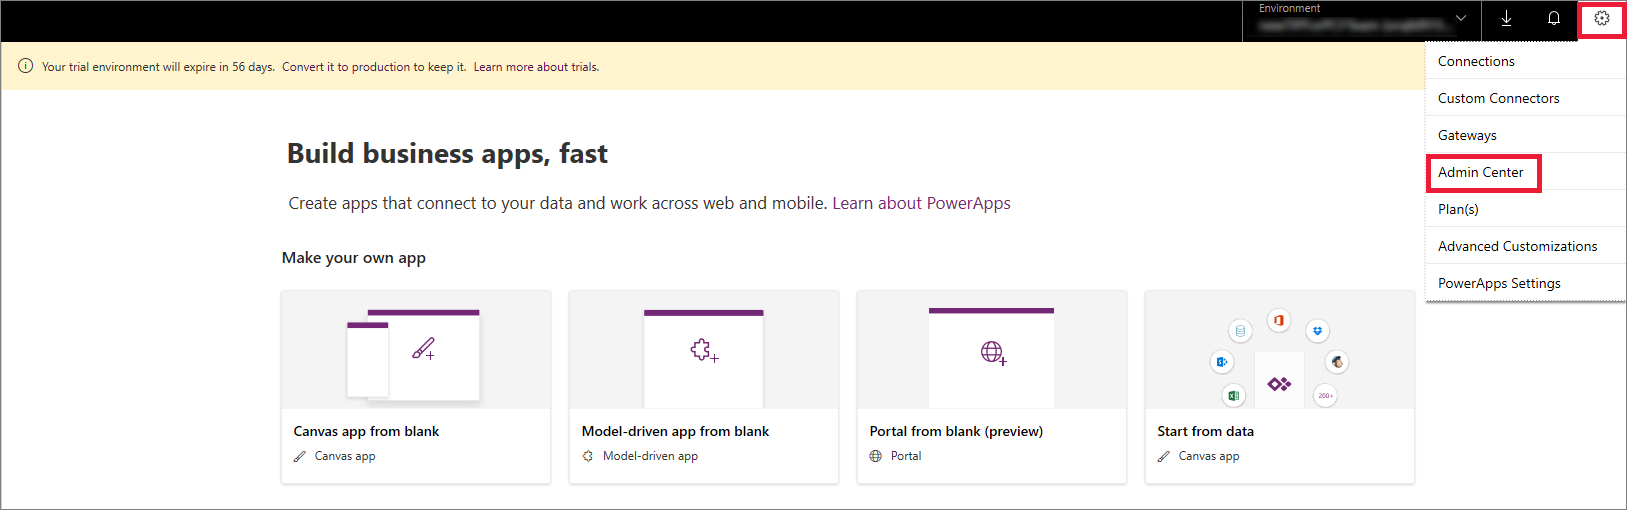 3. On the left pane, select **Environments**, select the environment where you want to enable this feature, and then select **Settings** 4. Expand **Product**, and select **Features** 5. From the list of available features, turn on **Power Apps component framework for canvas apps**, and then select **Save** 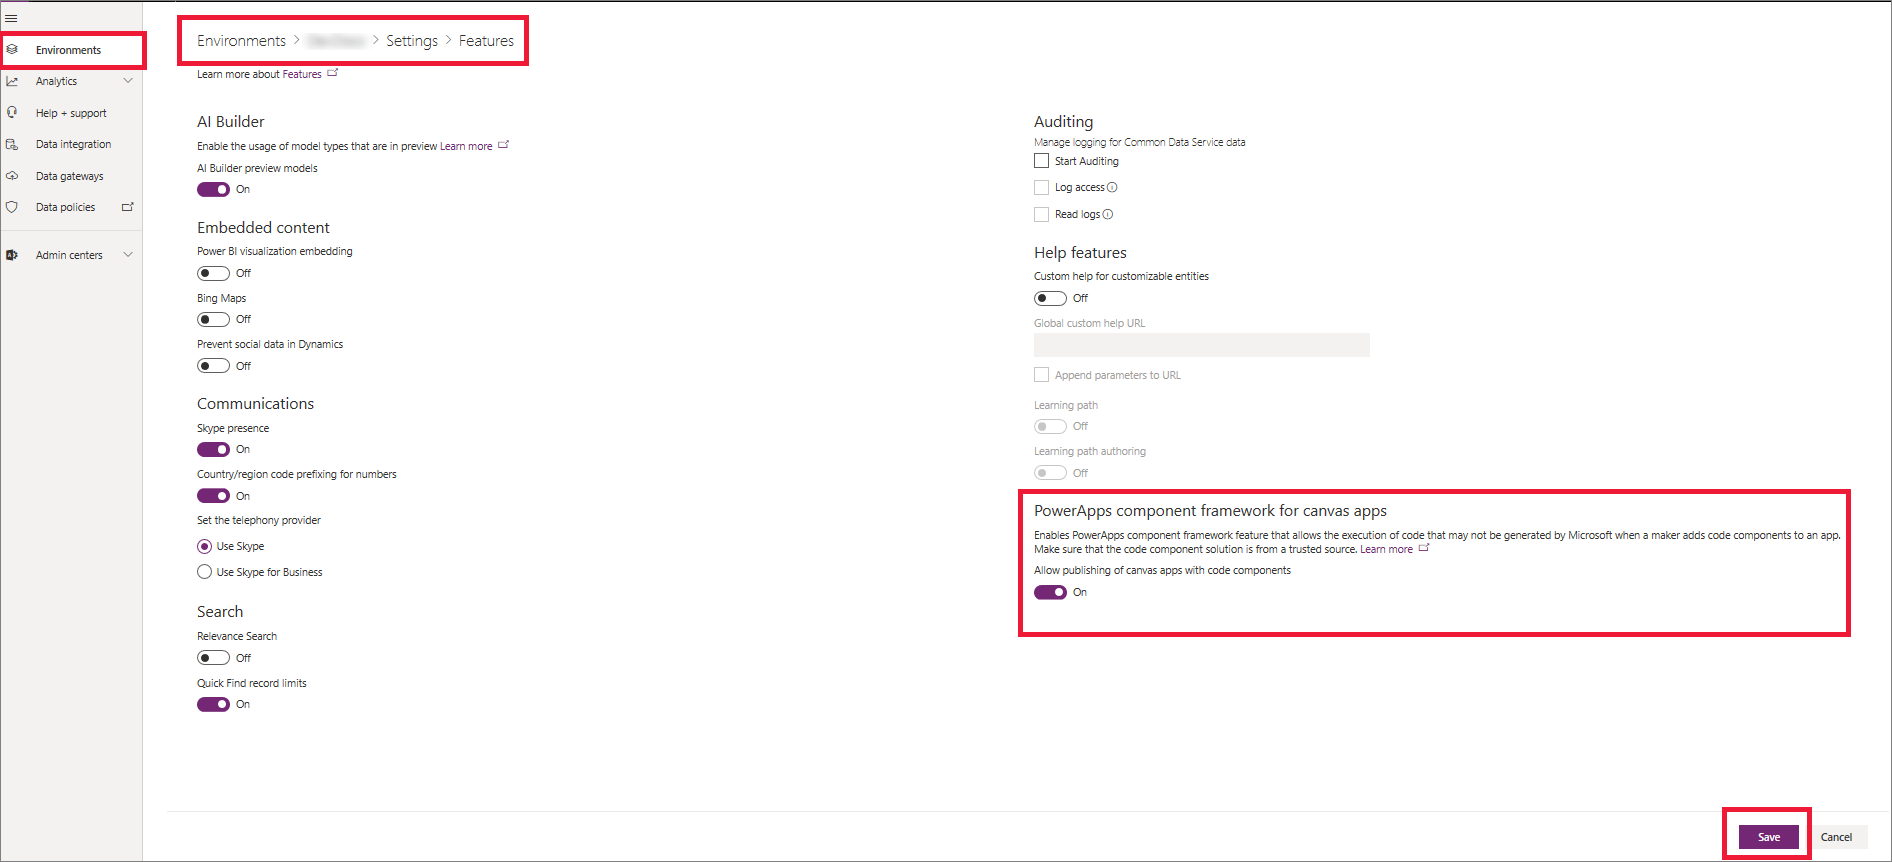 ## Implementing Code Components After you enable the Power Apps component framework feature in your environment, you can start implementing the logic for code components. For a step-by-step tutorial, go to [Create your first code component](https://learn.microsoft.com/en-us/power-apps/developer/component-framework/implementing-controls-using-typescript). **Recommendation**: Check the [limitations](https://learn.microsoft.com/en-us/power-apps/developer/component-framework/limitations) of code components in canvas apps before starting implementation. ## Add Components to a Canvas App 1. Go to Power Apps Studio 2. Create a new canvas app, or edit an existing app to which you want to add the code component > **Important**: Make sure the solution .zip file containing the code components has already been [imported](https://learn.microsoft.com/en-us/power-apps/maker/data-platform/import-update-export-solutions) into Microsoft Dataverse before you proceed to the next step. 3. On the left pane, select **Add (+)**, and then select **Get more components** 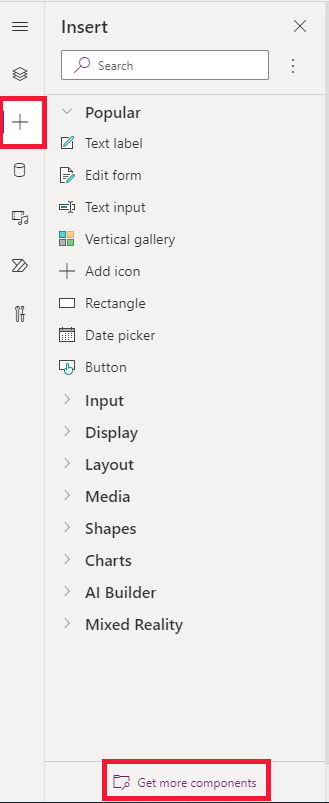 4. Select the **Code** tab, select a component from the list, and then select **Import** 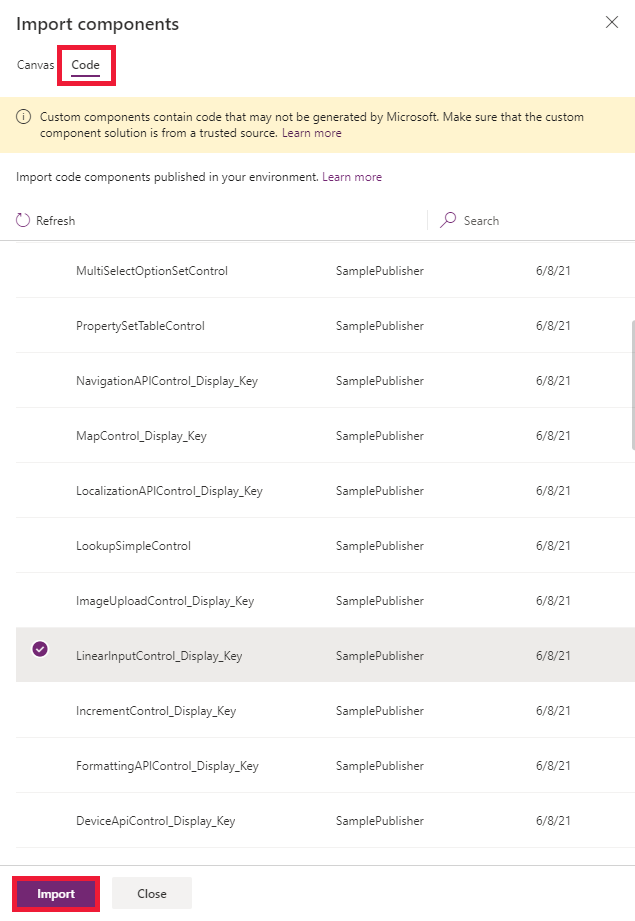 5. On the left pane, select **+**, expand **Code components**, and then select the component to add it to the app 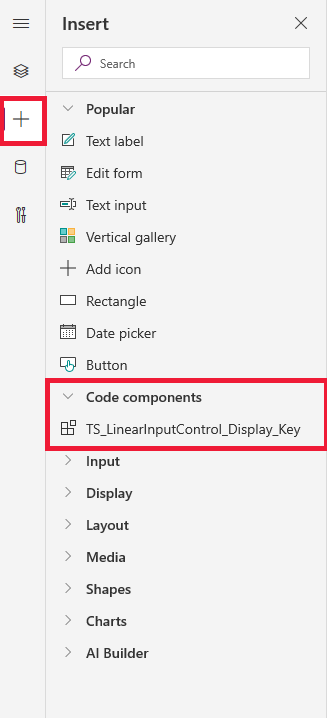 > **Note**: You can also add components by selecting **Insert > Custom > Import component**. This option will be removed in a future release, so we suggest using the flow described above. ### Component Properties On the Properties tab, you'll notice the code component properties are displayed. 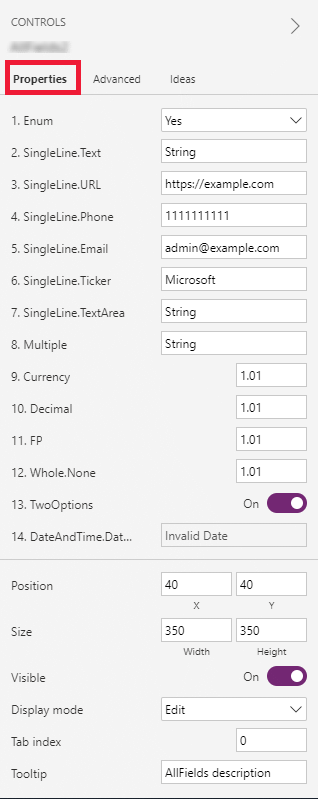 > **Note**: Existing code components can be re-imported by updating the code component's manifest version if you want the properties to be available in the default Properties tab. As before, the properties will continue to be available on the Advanced properties tab. ## Delete a Code Component from a Canvas App 1. Open the app where you've added the code component 2. On the left pane, select **Tree view**, and then select the screen where you've added the code component 3. Next to the component, select **More (...)**, and then select **Delete** 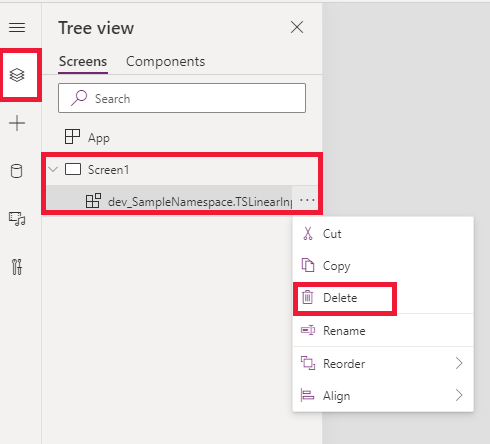 4. Save the app to see the changes ## Update Existing Code Components Whenever you update the code components and want to see the runtime changes, you need to change the `version` property in the manifest file. We recommend that you change the version of the component whenever you make changes. > **Note**: Existing code components are updated only when the app is closed or reopened in Power Apps Studio. When you reopen the app, it asks you to update the code components. Simply deleting or adding code components back into the app won't update the components. Publish all the customizations in the updated solution first, otherwise updates made to the code component won't appear. ## See Also - [Power Apps component framework overview](https://learn.microsoft.com/en-us/power-apps/developer/component-framework/overview) - [Create your first code component](https://learn.microsoft.com/en-us/power-apps/developer/component-framework/implementing-controls-using-typescript) - [Learn Power Apps component framework](https://learn.microsoft.com/en-us/training/paths/use-power-apps-component-framework)
Related Skills
More skills in Business, Marketing & Sales
Ab Testing
When the user wants to plan, design, or implement an A/B test or experiment, or build a growth experimentation program. Also use when the user mentions "A/B test," "split test," "experiment," "test this change," "variant copy," "multivariate test," "hypothesis," "should I test this," "which version is better," "test two versions," "statistical significance," "how long should I run this test," "growth experiments," "experiment velocity," "experiment backlog," "ICE score," "experimentation program," or "experiment playbook." Use this whenever someone is comparing two approaches and wants to measure which performs better, or when they want to build a systematic experimentation practice. For tracking implementation, see analytics. For page-level conversion optimization, see cro.
Ab Test Setup
When the user wants to plan, design, or implement an A/B test or experiment. Also use when the user mentions "A/B test," "split test," "experiment," "test this change," "variant copy," "multivariate test," "hypothesis," "conversion experiment," "statistical significance," or "test this." For tracking implementation, see analytics-tracking.
Ab Test Setup
Ab Test Setup linked from Corey Haines marketing skills, with the upstream skill instructions available on GitHub.
Ab Test Store Listing
When the user wants to A/B test App Store product page elements to improve conversion rate. Also use when the user mentions "A/B test", "product page optimization", "test my screenshots", "test my icon", "conversion rate optimization", "CPP", or "custom product pages". For screenshot design, see screenshot-optimization. For metadata optimization, see metadata-optimization.
Account Research
Research a company or person and get actionable sales intel. Works standalone with web search, supercharged when you connect enrichment tools or your CRM. Trigger with "research [company]", "look up [person]", "intel on [prospect]", "who is [name] at [company]", or "tell me about [company]".
Account Research
Research a company using Common Room data. Triggers on 'research [company]', 'tell me about [domain]', 'pull up signals for [account]', 'what's going on with [company]', or any account-level question.
Explore Other Categories
Skills from other categories with shared topics
ASP.NET REST API Development
Guidelines for building REST APIs with ASP.NET
ColdFusion Coding Standards for CFC Files
ColdFusion Coding Standards for CFC component and application patterns
Instructions Blazor
Blazor component and application patterns